Big F***ing Monitor
Repairing a Samsung Odyssey G9 Monitor.
Snatched It Off the Stork on a Friday
On January 16, a day much like any other, I was browsing Facebook Marketplace as I am want to do several times a day; one must always be optimizing his dealflow. This ordinary day was made quite special by my finding for sale a Samsung LC49RG90SSN– a Big F***ing Monitor– for $90, broken of course. But pay keen attention to the description:
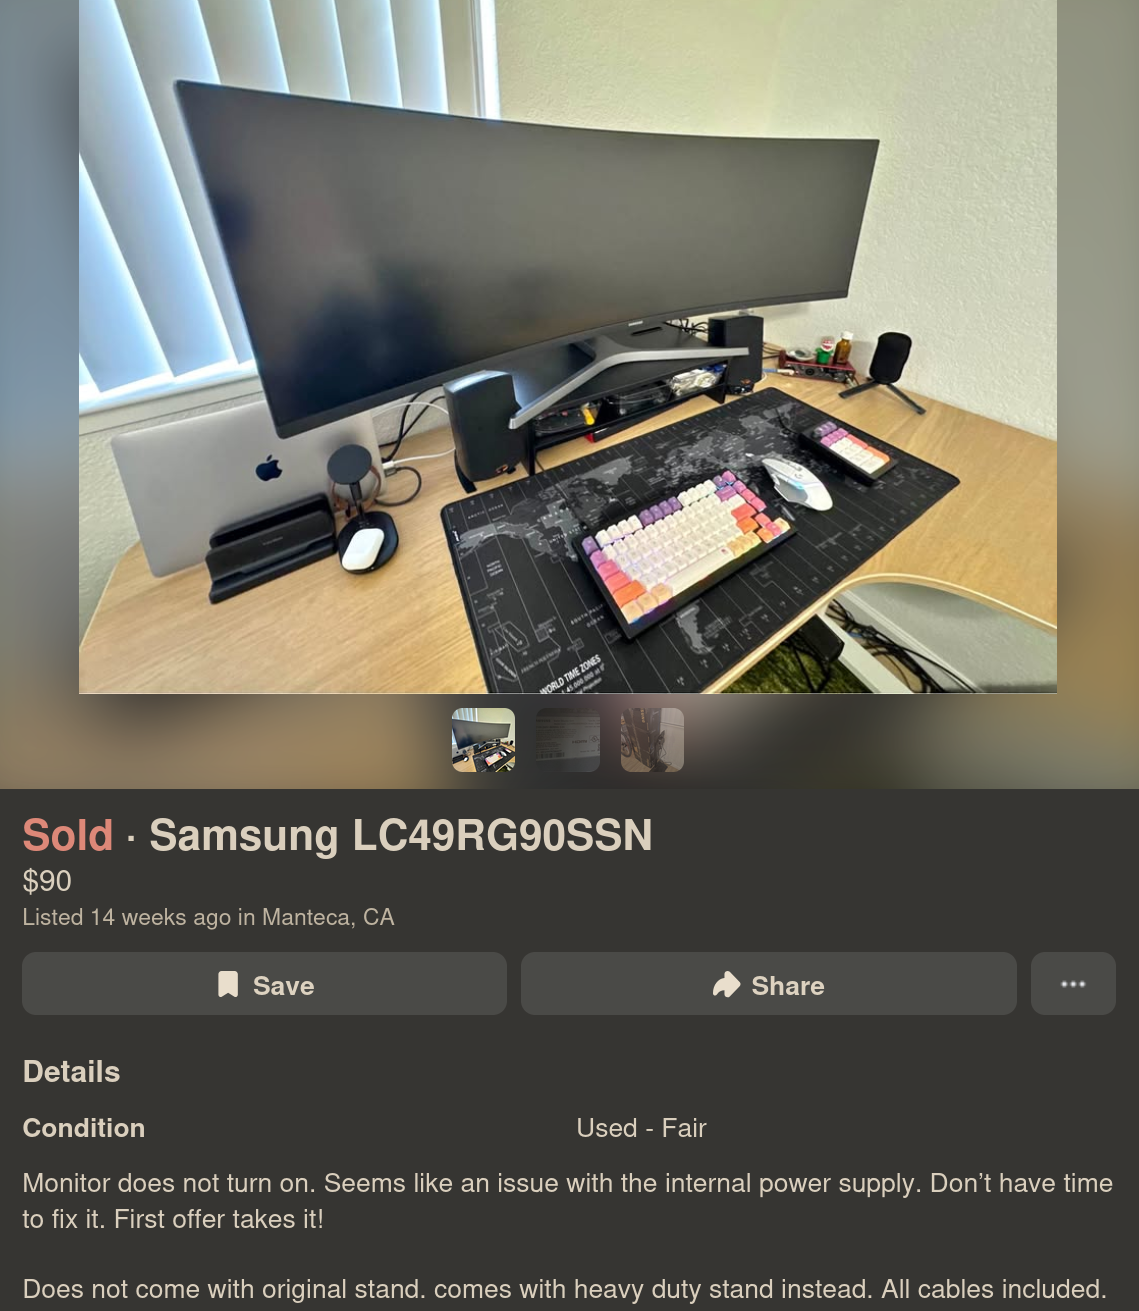
The purveyor notes “Monitor does not turn on. Seems like an issue with the internal power supply.” Now, I’m not one to trust a Marketplace listing, but even for parts, this is probably worth more than that, so I shot him an offer:

And the next day I had it in my office. Just as the seller described, the monitor did absolutely nothing, no lights, no warming, no buzz, a good sign that the power supply was in fact the culprit. I connected the monitor to line voltage through the multimeter in amperage mode and measured no current, not even inrush current.
Figuring out how to remove the back was a real struggle, and my methods left quite a few scars on the perimeter of the shell.

Once free of the rest of the monitor I was able to test the power supply on its own.
A Shaky First Step
Now at this point I feel it is my responsibility to tell you that this is not a tutorial, this is blog where I am chronicling my process including my poor judgement and potentially very dangerous mistakes. Do not do what I am doing. Please and thank you.
A confession: I don’t really know how switching mode power supplies work. I was always more into signal processing and embedded devices while in college; I did not take a single class on power electronics. All I knew was generally what each stage was supposed to be doing and which parts I shouldn’t touch.
So naturally, I turned to the LLM.
I was probably out of free Claude tokens when I started this because I started my diagnostic with Deepseek:
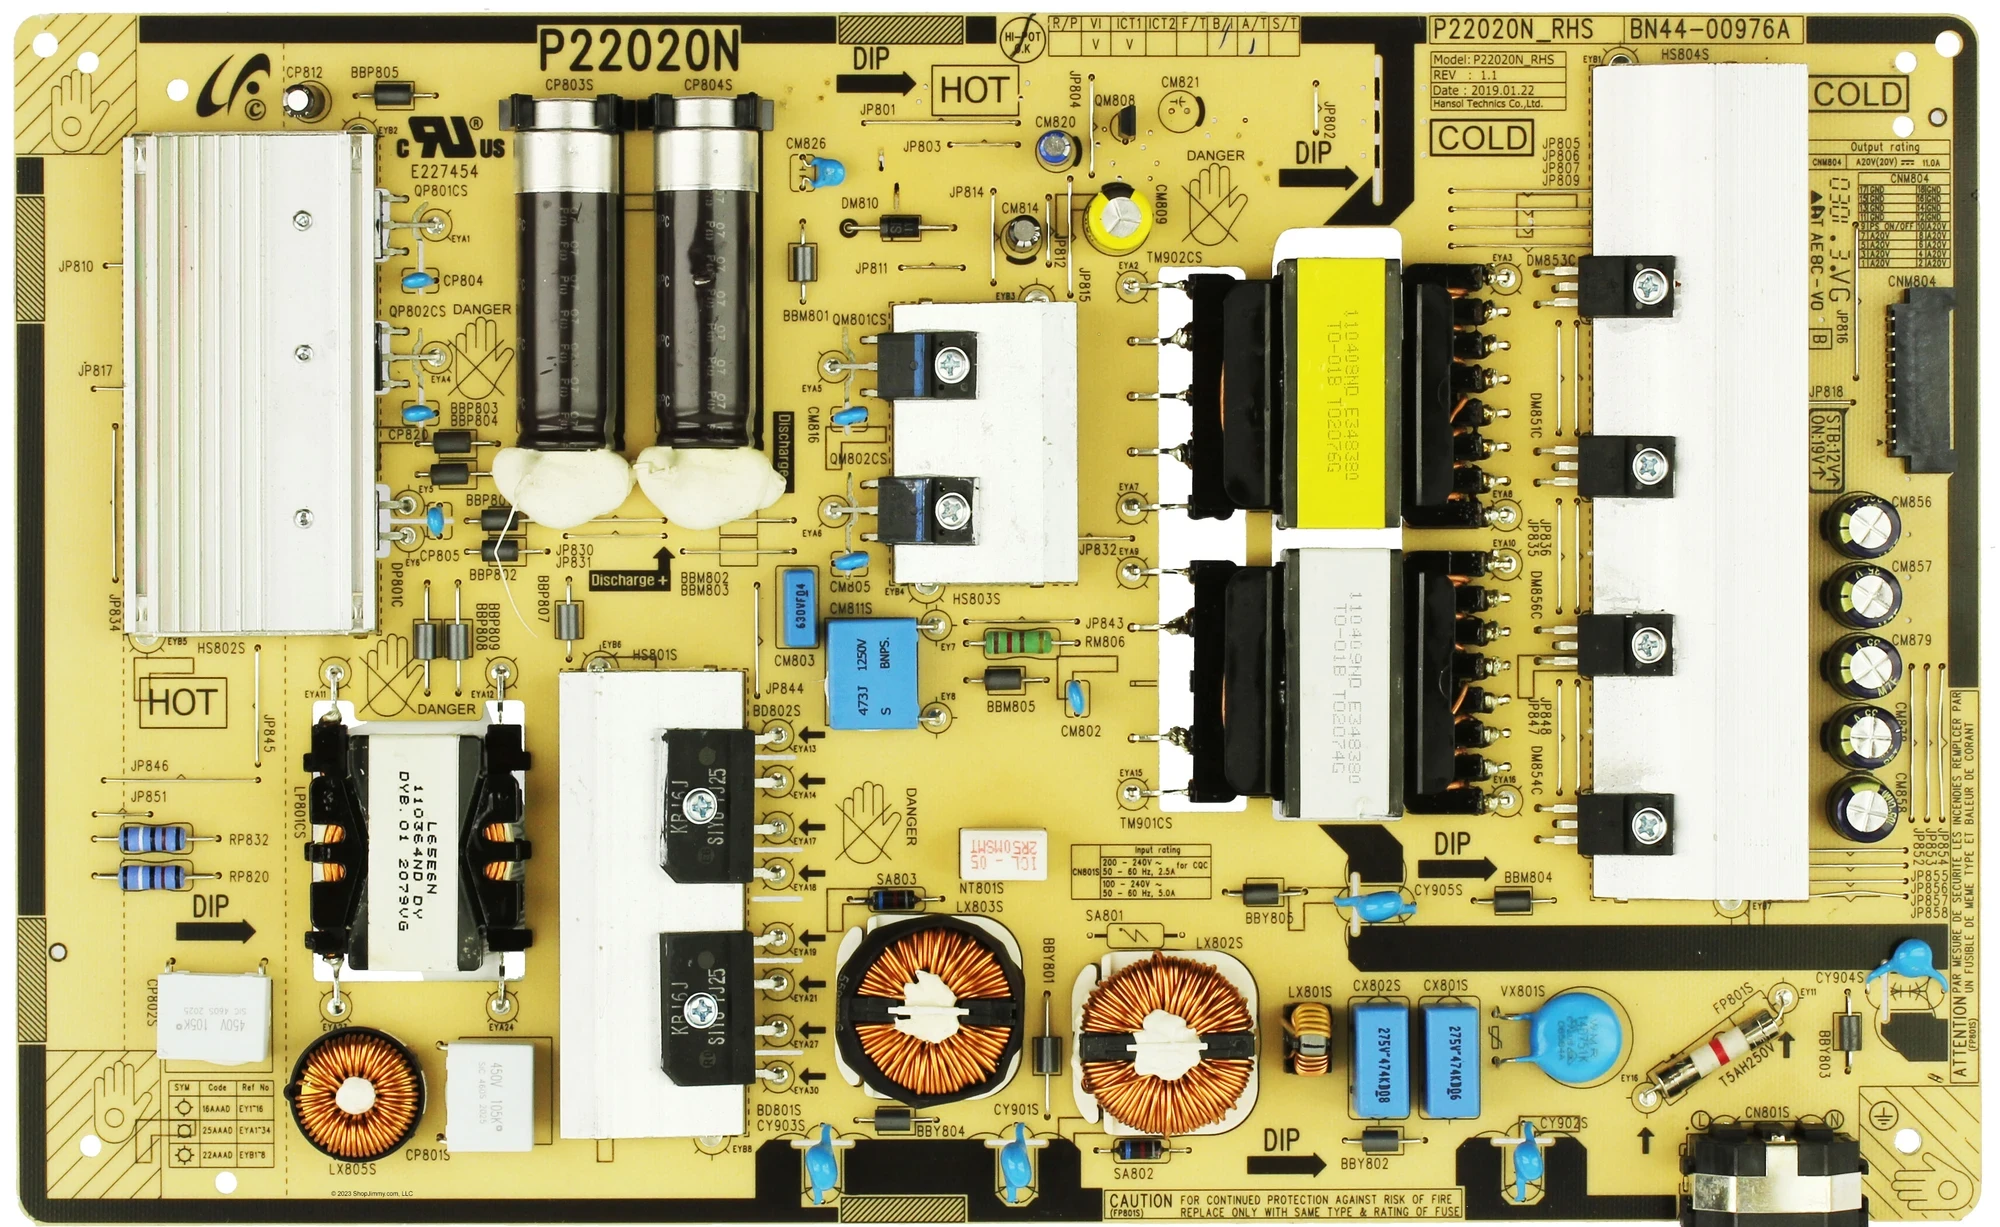
I am repairing a Samsung G9 Odyssey power supply P/N BN4400976A. After the initial visual inspection (no obvious faults, e.g. burning or corrosion), I connected it to line voltage. There is no voltage at CNM804, nor at JP818. In fact, the fuse, FP801S (T5AH250V) has blown and the board is not powering up at all. Am I correct in assuming that I first ought to just replace this fuse? My thinking is that even if there is a fault elsewhere, I cannot determine that until I replace it.
The numbers probably don’t mean all that much to you, but Samsung seems to have a fairly standard topology (maybe I’m using that word incorrectly) across all of their television/monitor switching mode power supplies, and I figured the numbers might yield useful searches for the LLM. Just for fun let’s keep track of the fuses. This one is Fuse 0.
Anyhow, I asked Deepseek to summarize its response to this prompt, that it may fairly represent itself in this public article:
What the AI Said (That I Absolutely Should Have Listened To)
In its infinite robot wisdom, my AI assistant laid out a perfectly sensible, safety-obsessed repair plan. It kindly informed me that:
A blown fuse is a symptom, not the problem. Replacing it without finding the root cause is like putting a new bandage on a severed artery and going for a jog.
It then begged me — in that polite, emotionally neutral way that AIs have — to do the following:
- Test the bridge rectifier and switching FETs first (because they're almost always the actual culprits).
- Build a Dim Bulb Tester — a magical device involving an incandescent light bulb that limits current and prevents catastrophic failure. The assistant described it as "the most important tool for repairing switch-mode power supplies."
- Do NOT, under any circumstances, just replace the fuse and plug directly into mains. It used all-caps and bold text. It mentioned "loud pop," "more component damage," and "another blown fuse."
I am not a smart man. I saw that the switching MOSFETs were shorted, so I ordered replacements and soldered them in, replaced the fuse (Fuse 1). I had a unfounded sense of optimism that this was all that had gone wrong. I did not read a short at line and neutral of the cord input. I did not check anywhere else:
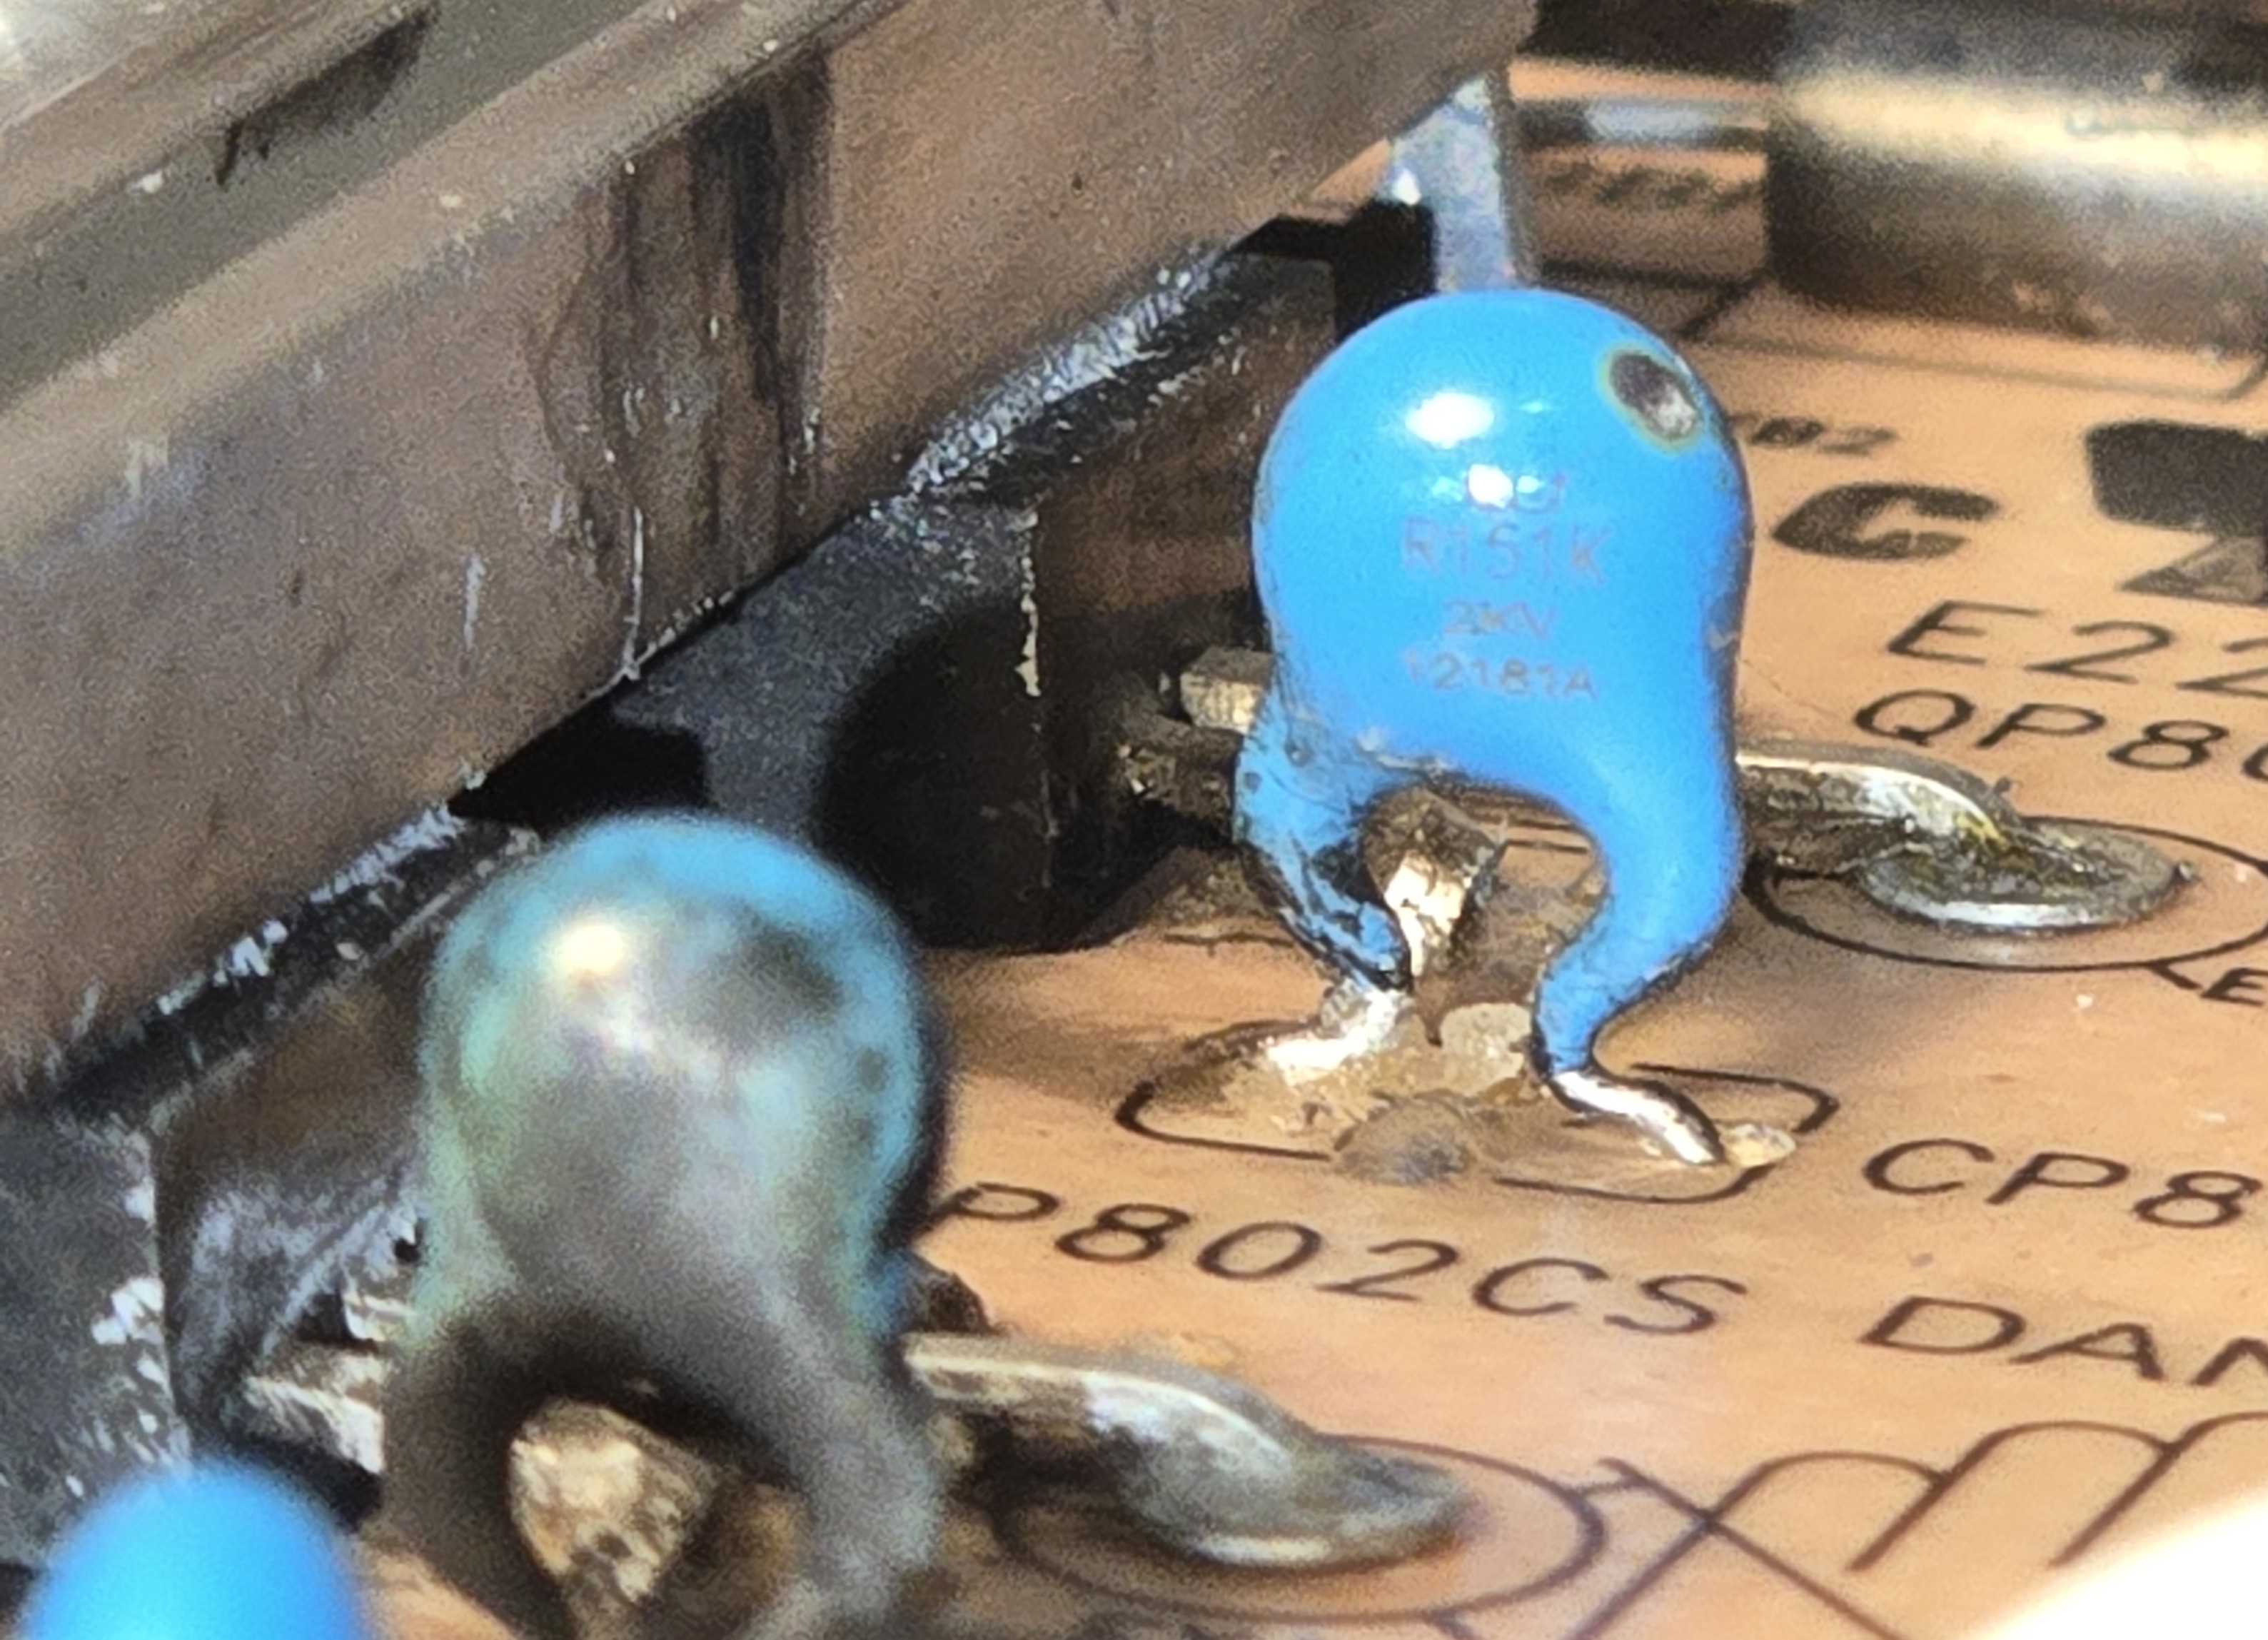
Alright, I found the transistors QP801CS and QP802CS to be shorted. they are model MMF60R190QS. I removed them and replaced them with GC20N65F, an equivalent transistor, as well as changed out the fuse. I realize I probably should have used a Dim Bulb Tester, but I got hasty and just plugged it in to Line voltage. There was arcing across the transistor area, seemingly local to QP802CS. The board is pretty scorched but the transistors themselves seem fine. Caps CP804 CP820 and CP805 all show sign of scorching, from the inside out.
In my defense it was getting quite late.
You may witness the carnage for yourself:
And Deepseek’s summary of itself (Good lord, one model that really needs to learn some brevity):
- "Stop. Disconnect immediately."
- The original shorted FETs were victims, not the cause. The real killer was probably the PWM controller IC.
- Those exploding capacitors? Innocent bystanders.
- Scrub carbon tracks off the PCB. Sniff for burnt components. Desolder and retest everything.
- At this point, just buy a replacement board.
That last point was enough to turn me off Deepseek for the time being, I’m no quitter.
Sound Footing
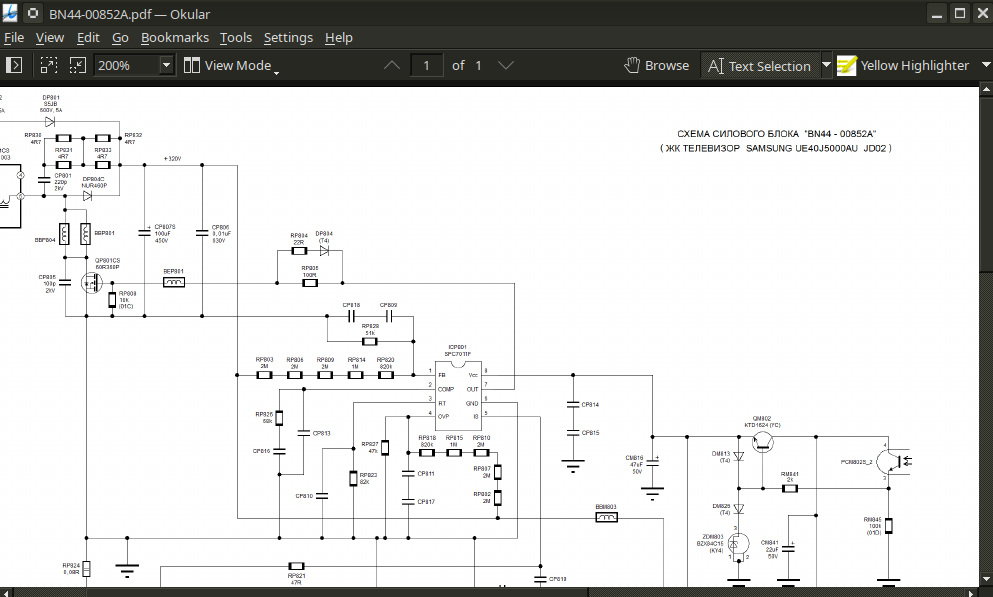
I spent a couple of days reading up on the design of the power supply and repair/diagnostic methodology specific to TVs. I managed to track down a schematic for a very similar power supply board, a BN44-00852A. I even built a dim bulb tester.
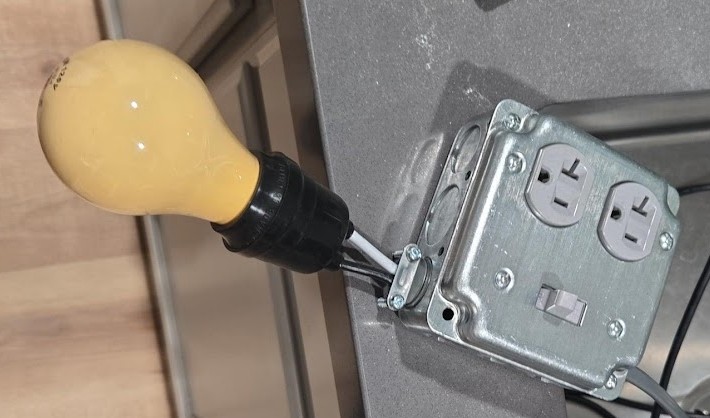
Dim bulb tester is really kind of GOATed. It’s a simple device, an incandescent bulb in series with an outlet, with a switch for convenience. If there is a short in the device being tested, the bulb glows brightly, and the current draw causes a large voltage drop across the bulb, protecting the tested device. In the case of my power supply, the bulb should initially glow brightly as the inrush current charges the big caps, and then dim.
Having constructed the tester and cleaned the PCB, I decided to switch to an LLM with a more indomitable spirit, Claude.
I related to it most of what I have here so I won’t repeat it.
Claude acknowledged the failed switching FETs and caps, but urged me to pursue faults in the power factor correction (PFC) circuit, especially the controller IC.
Power factor is the ratio of real power vs apparent power. In a circuit with poor/low quality factor, the supply “sees” more power drawn than is actually used by the device. Extra power “sloshing” back and forth from supply to device is called reactive power. The PFC circuit brings voltage and current closer to being in phase with one another, increasing efficiency.
Now, in my research the week prior, I watched a video of an old British man repairing a similar power supply just by cutting the trace connecting the switching FETs to the controller ICs. See, the total current draw of a monitor, even one as big and bright as this, is not that great. These PFC circuits are implemented to meet certain regulatory standards about efficiency that are just not that important to me. (The extra cost of the reactive power this monitor draws is not greater than what I’d pay for these discontinued ICs or god forbid a new power supply board from Samsung.)
But we’re getting ahead of ourselves, is it even bad? I desoldered the resistors connecting the bridge rectifier to the switching circuit, RP832 and RP820, and began probing. Based on ~3 hours of scraping silicone and probing tiny resistors, no. The PFC circuit is fine.
There was another whole bit where Claude hallucinated some specs about my replacement transistors and threw a little fit until I gave it the relevant sections in the datasheets.
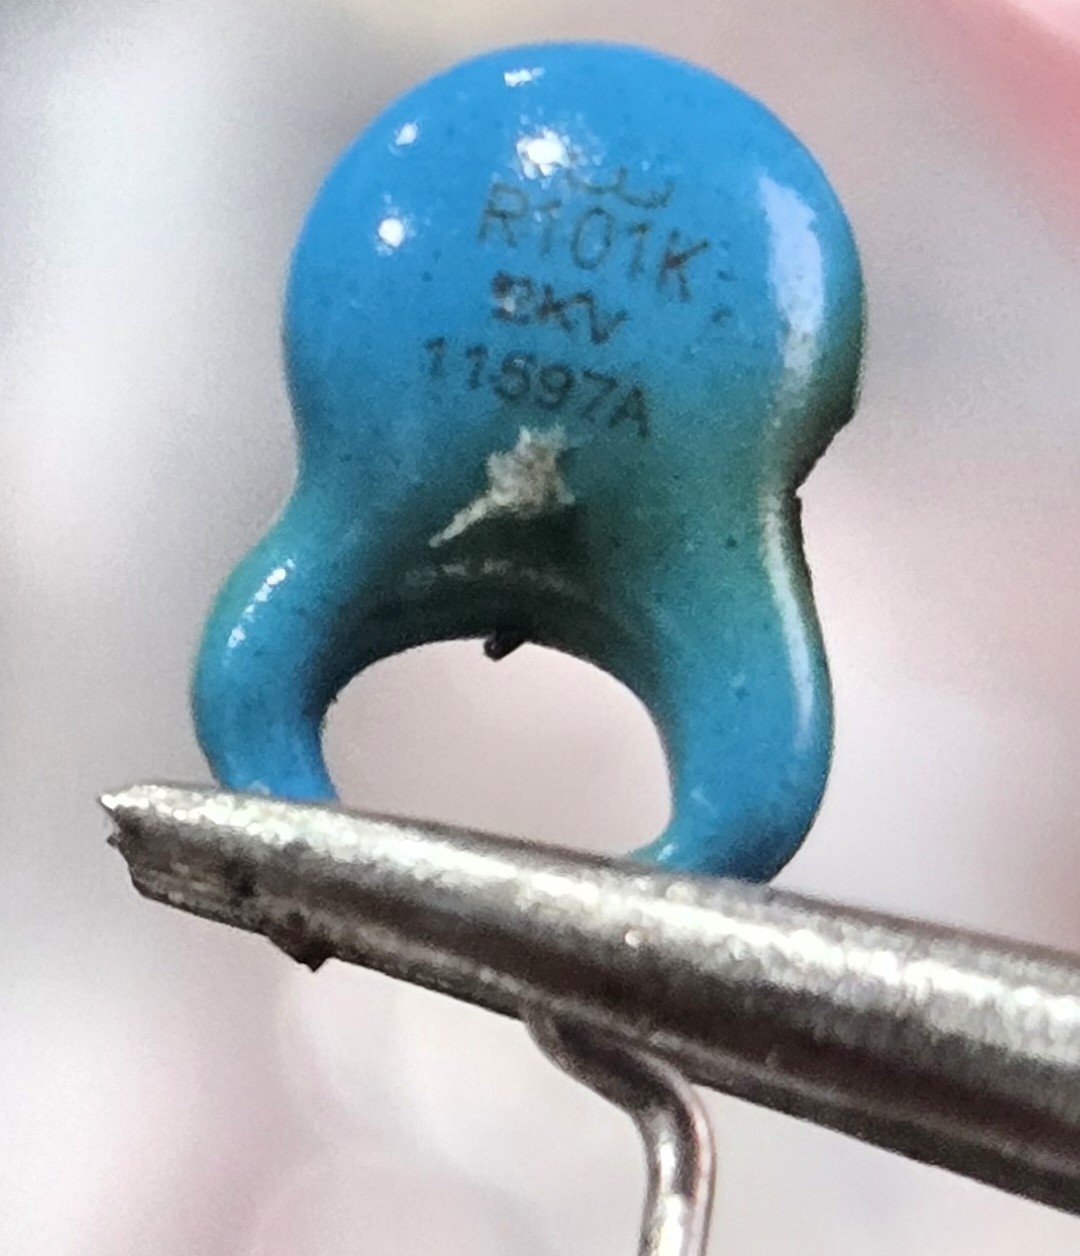
I bought a new recovery diode just to be safe, and replaced the burnt ceramic capacitors with new ones. Reading the tiny letters on the bodies was a special hell for my weak eyes; several times during this little project I considered purchasing a microscope.
Everything was testing just fine so I put the resistors back in, screwed down the heatsink, and put in a new fuse (Fuse 2). This time I plugged it into the dim bulb tester. I switched it on for ~5 seconds no great effect (a good sign). The bulb seemed fairly, dim, and stayed dim throughout the duration. I unplugged it. None of the components seemed warm. The big caps are not even charged to one volt (these are going to reach 300-something volts in normal operation). Round two, same setup but with my multimeter test leads checking the input voltage to the PSU. Switching it on, I have 4V, dropping to 3.8. Bulb brightness is unchanged and the voltage remains steady.
I think we ought to try plugging it into mains. And… still no dice. Less dramatic this time, but the fuse fizzled out just the same.
What gives?
This one really threw me for a loop for quite a while. I was probing once again. Something between putting the PSU back together and plugging it in had caused a short in the PFC circuit. Specifically I could measure a short between the legs of the big filter caps (remember the ones that were not charging!). How had this happened? The caps are rated for 600V and had tested perfectly fine just minutes ago. They looked perfectly fine, not bulging, not warm. I desoldered them and tested them alone. Perfectly fine. WTF.
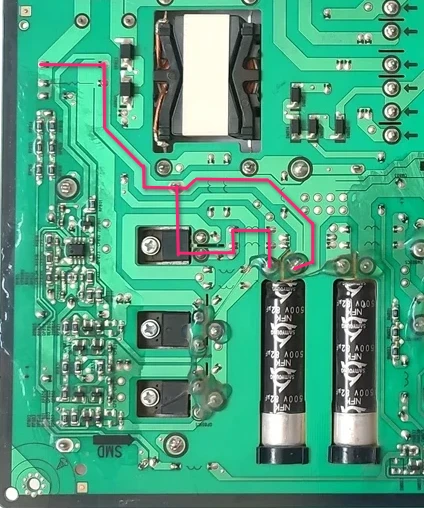
OK, so it’s not the capacitors, but something parallel to the capacitors. Let’s take a look at the bottom of this PCB:
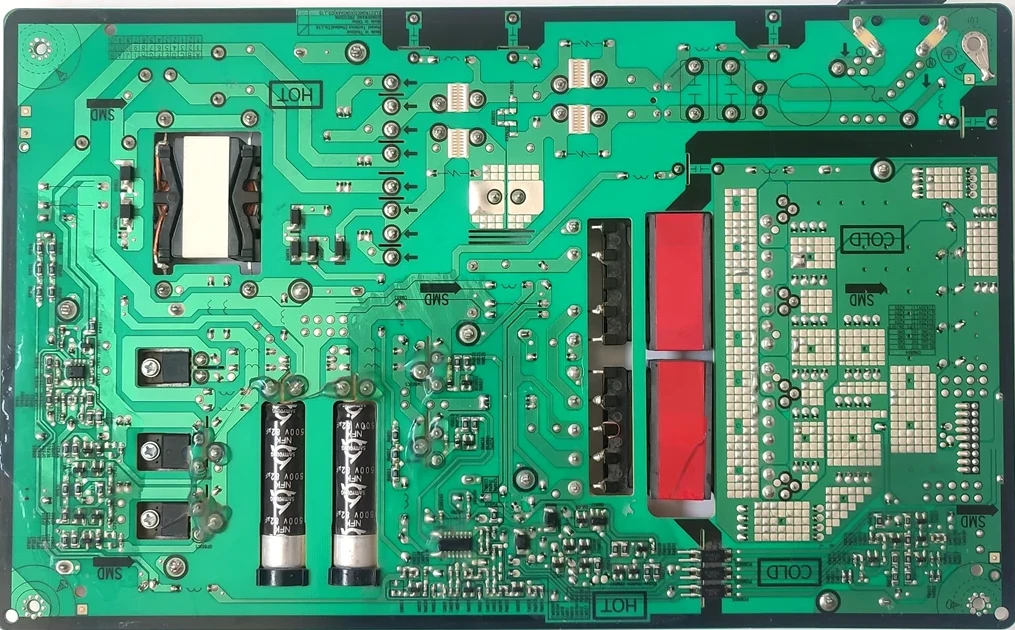
I’m not quite even sure how I got to this other than pure dumb luck, so I’ll illustrate something for you.
Here is the current path from the filter/rectifier stage to the filter caps of interest:

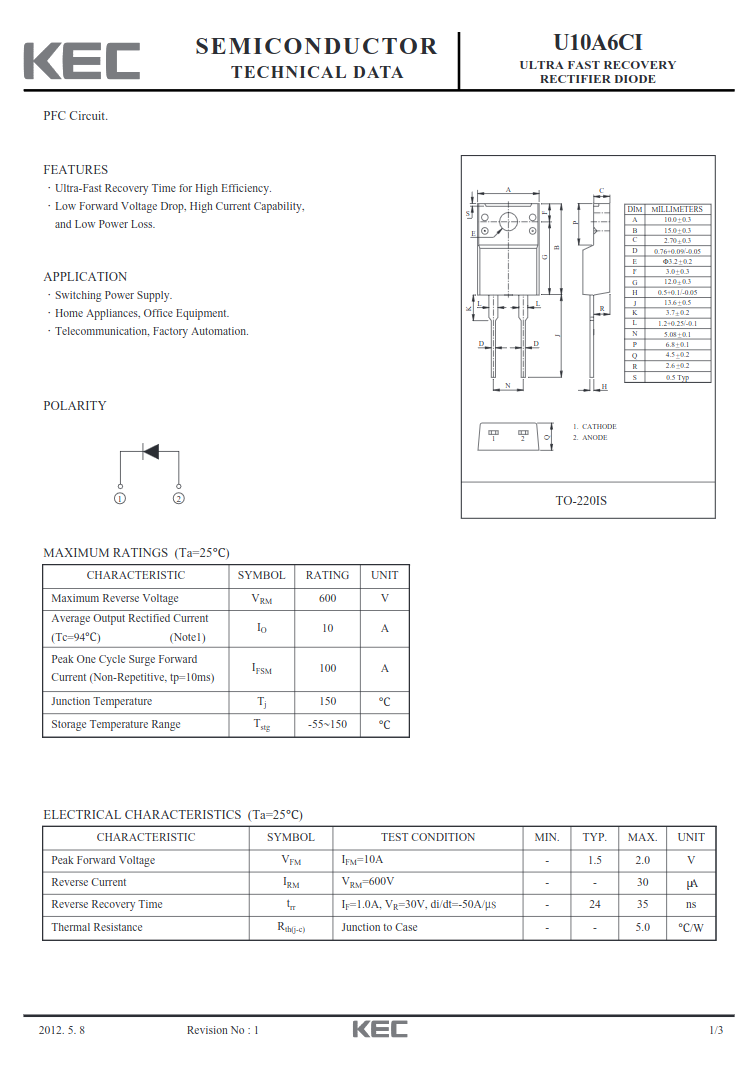
And now, two datasheets, the original U10A6CI diode and the replacement LXA10T600:
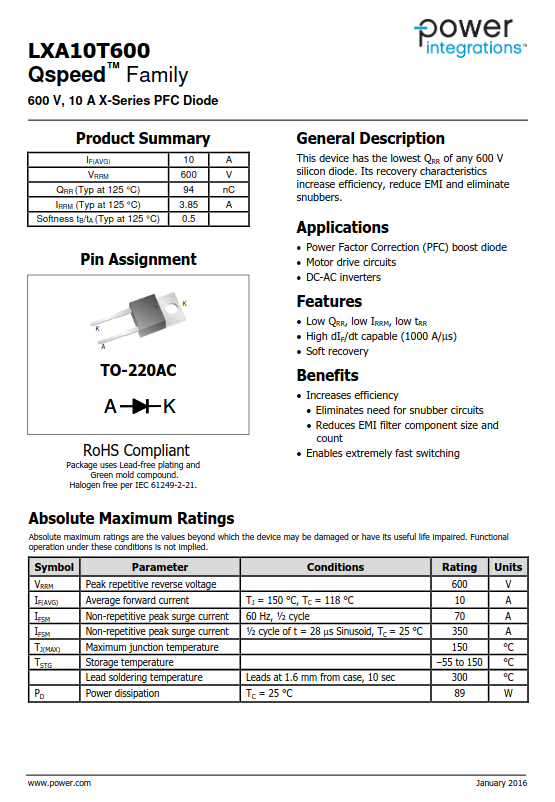
And just for good effect, observe them irl:

Noticing? Maybe not, let me make it explicit with another illustration:
The replacement diode’s mounting flange is electrically connected to the cathode (K) of the diode itself.
The path through the capacitor doesn’t “matter” except to illustrate why the cap didn’t charge, the big issue is the cathode getting that high voltage input instead of what it’s supposed to get at the output of the cap.
The simplest solution to this problem was to just cut one of the leg of the heat sink, simple enough with some snips, and to desolder the leg from the board. The heatsink is soldered in three other places, and I did check this time that the heat sink was not electrically connected to any other part of the circuit.
Claude seems to have gotten understood a portion of what happened before I tried it with mains. As I described, the big caps had not charged much at all when connected to the dim bulb tester. It remarks:Continuing:✓ No catastrophic shorts (good!)
✓ Input filter is okay
✗ PFC stage is not starting up
✗ No caps charging = PFC controller (ICP801S) isn't switching
The ICP801S needs a certain startup voltage (typically 12-18V) on its VCC pin before it begins operation. With only 4V at the AC input through the dim bulb, there's not enough voltage getting through the startup circuit to wake up the PFC controller.Claude asked that I attempt this once more with a larger bulb, a 120W, to get more current voltage to the PFC circuit, but I really could not be arsed to drive to the hardware store again.
At this point, I was not sure I could trust anything. Everything seemed to check out. I replaced the transistors for good measure. A new fuse was installed (Fuse 3).
I tested it with the dim bulb tester one more time. Everything looked good.
And on mains, all good. The fuse did not blow. The output pins produced their low voltage, and when the standby pin was energized, the voltage went up to 19.2 V.
Time to put it back on the monitor.
Success
This was really an nerve-wracking moment for me, but moments after the monitor was plugged in, the power light shone on. I pressed it once, and a menu told me there was no source detected.
And connecting it to my laptop:
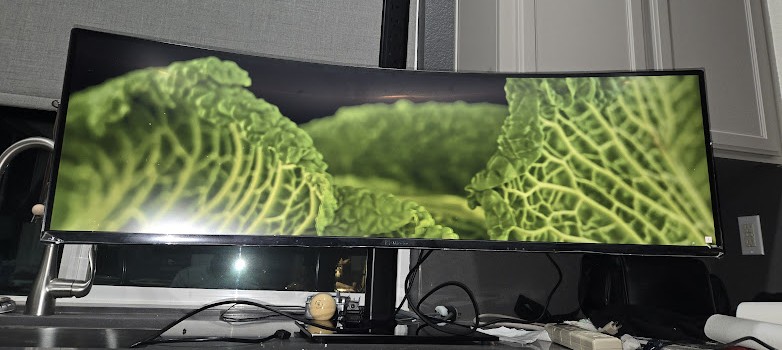
And I am typing this very article at this very monitor at this very moment.
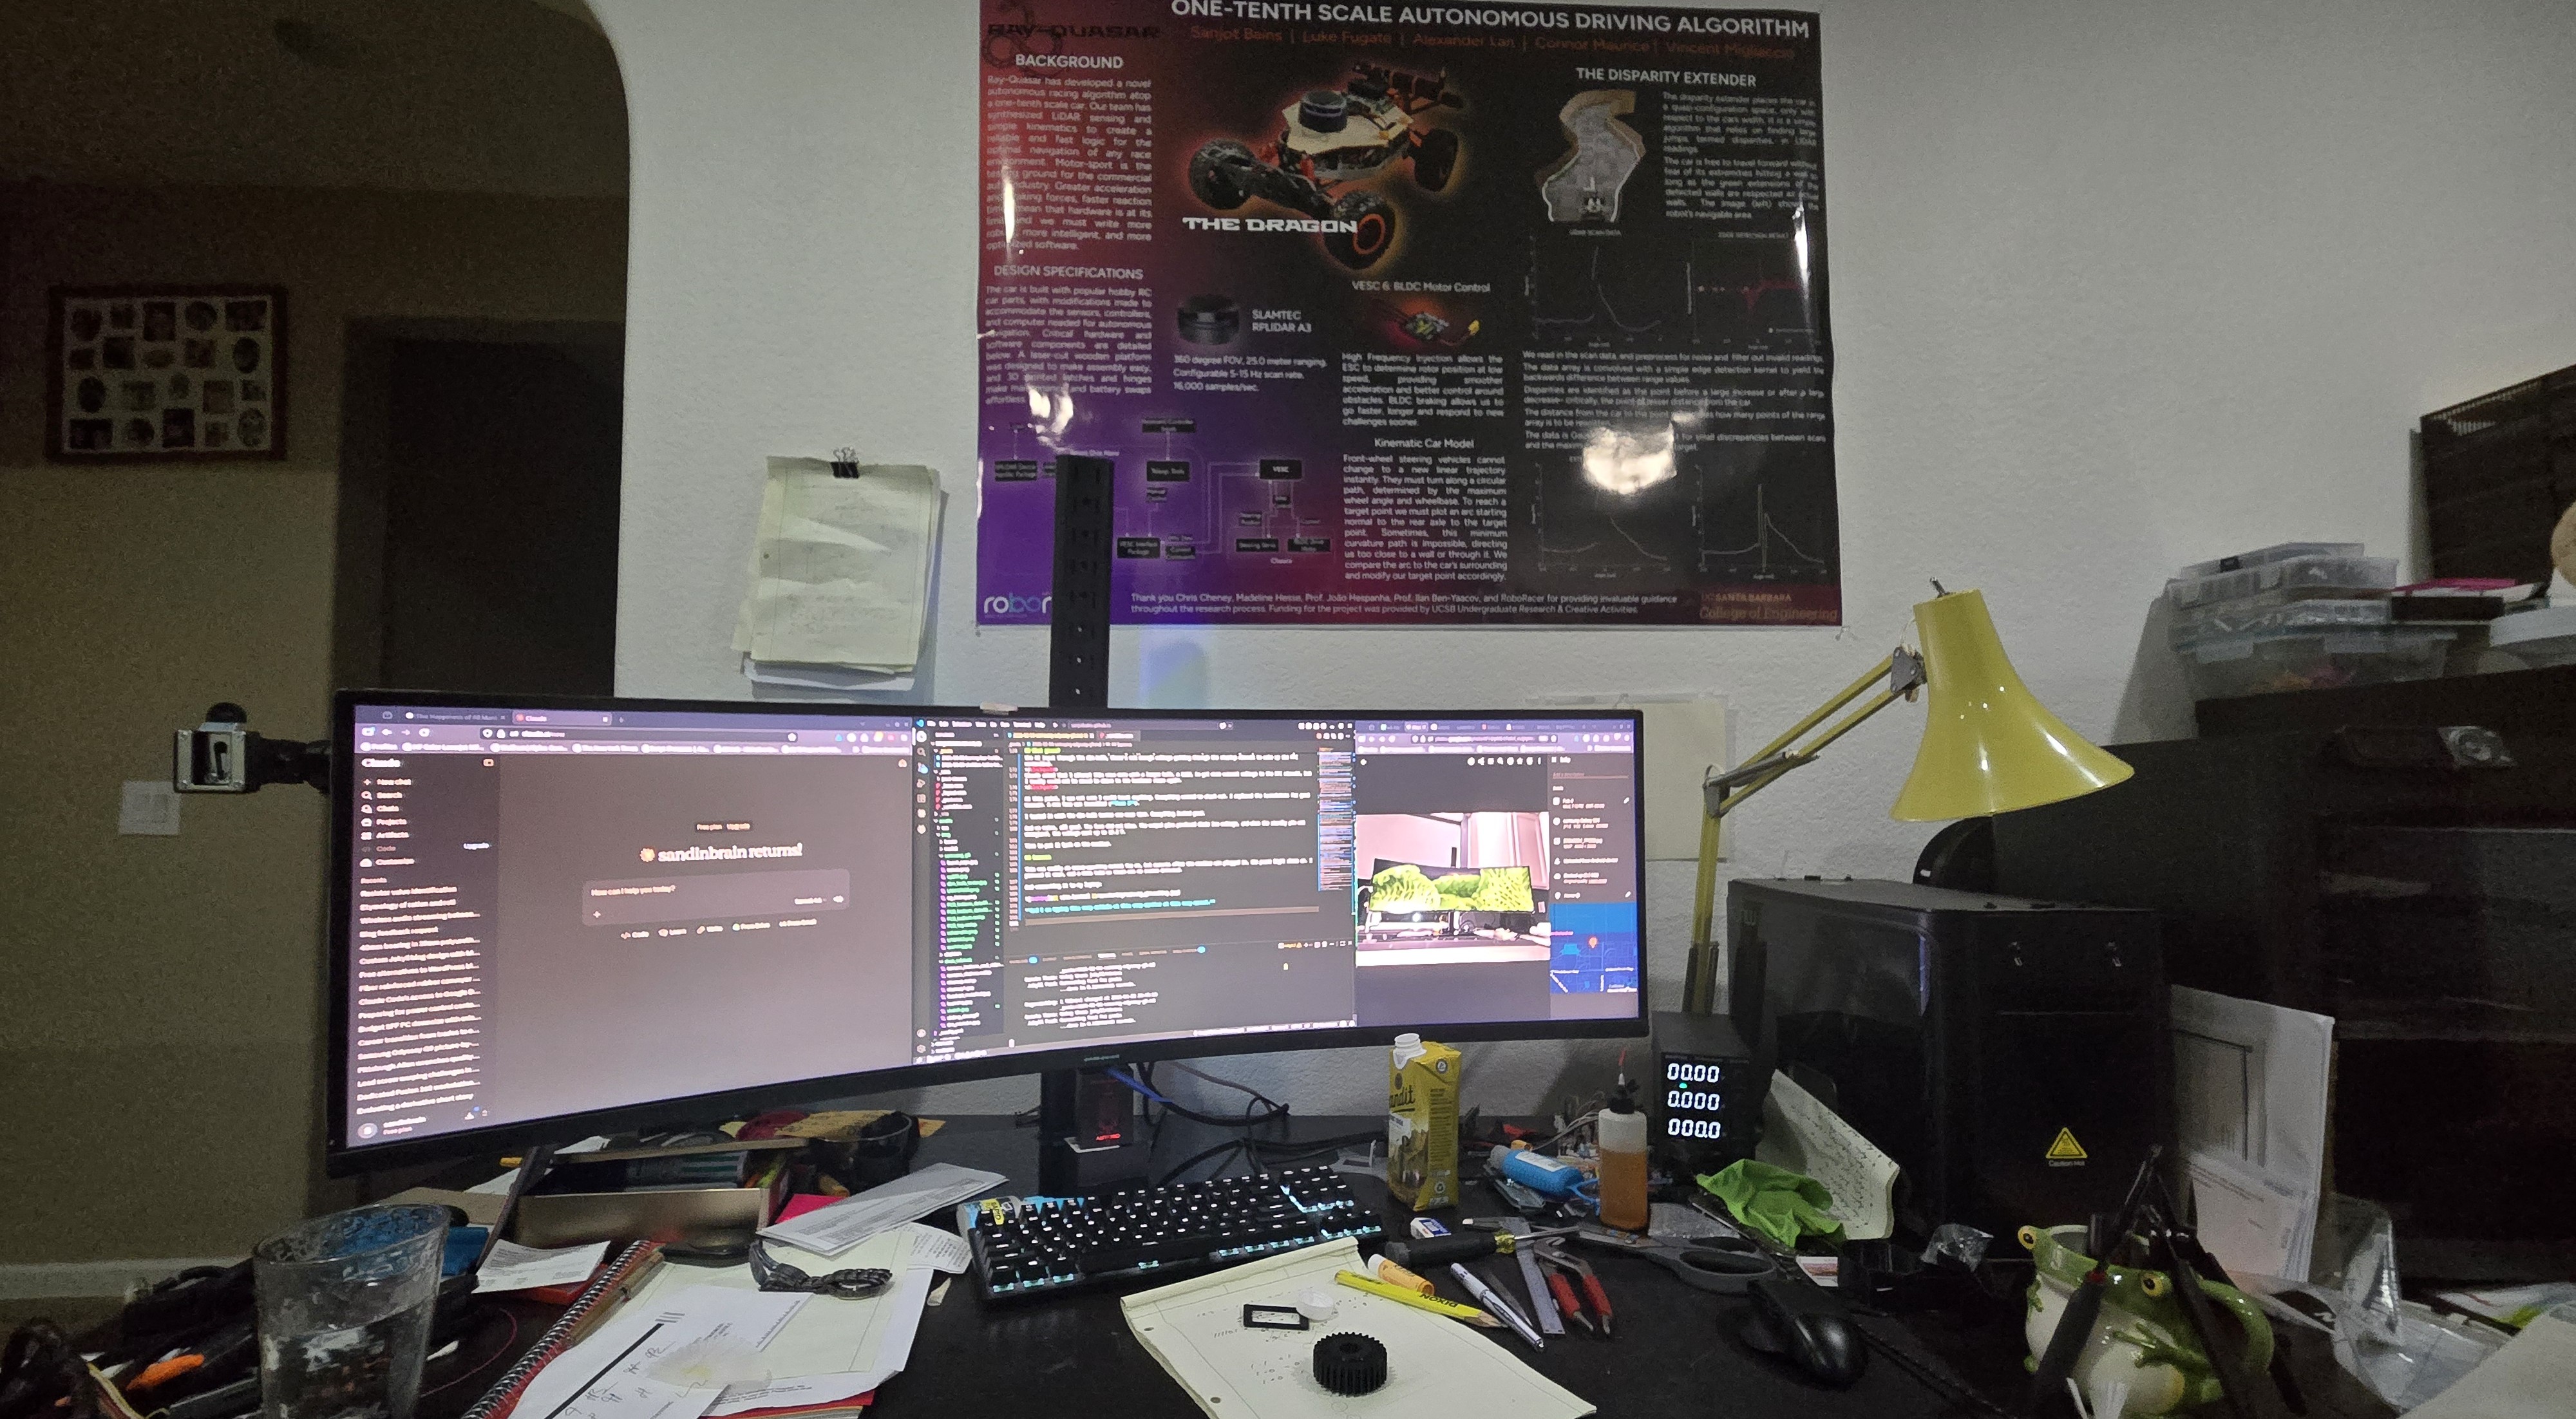
I’m not much of a gamer, so I’ll never really get the most out of it, and I do sort of miss the DPI of my 27” 4K monitor this is replacing, but this monitor provides extraordinary real estate for productivity. Two 27” monitors would have the same amount of screen, but the middle bezel destroys that central prime real estate. I think it’ll be sticking around.